Recipes

Homemade Penguin Biscuit Recipe

homemade-penguins-1024x683.jpg

I created this recipe for my Feasting on Romantic Comedy Novelicious column a few months ago, but my children adored these biscuits so much, I had to reproduce the recipe here.

It isn't a quick recipe as there are a few stages (making the biscuit, making the sandwich layer, coating in chocolate) but my goodness they are worth every minute.

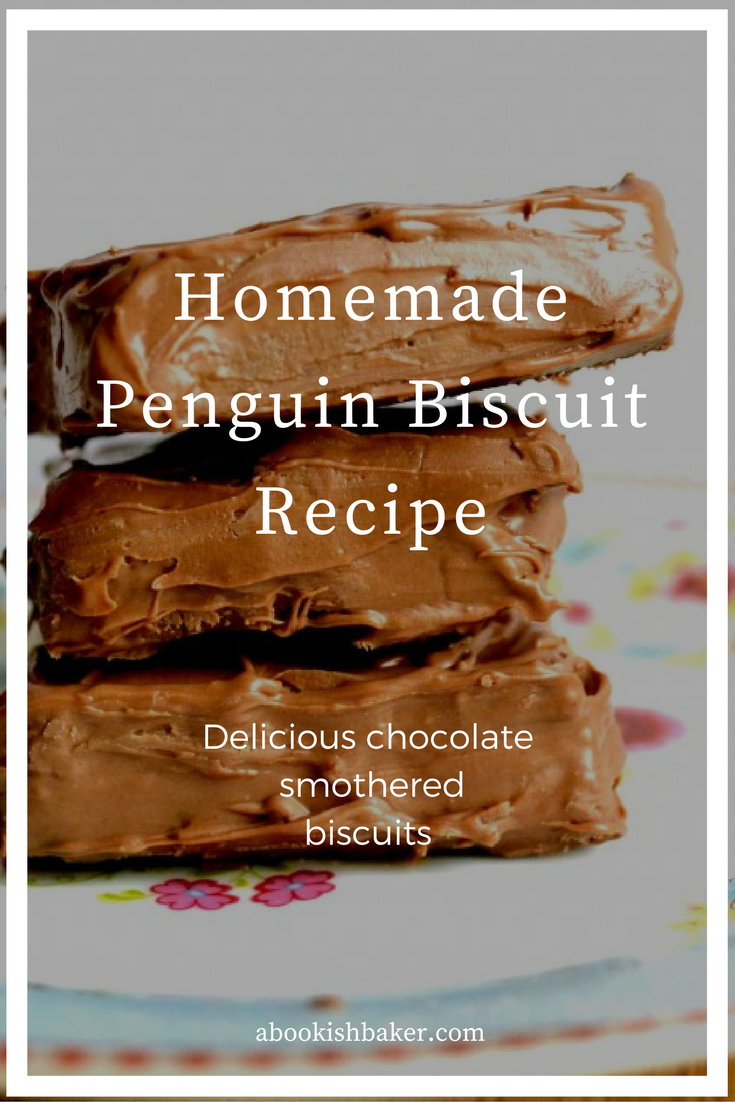
Recipe for Homemade Penguin Biscuits

Equipment

Electric mixer, like a KitchenAid (it just makes it so much easier and quicker), large food bag, rolling pin, a rectangle shaped cookie cutter (though you can, of course, make them any shape you like), baking tray covered in baking parchment, fish slice (or similar), baking rack.

Ingredients

For the biscuit:

  • 200g butter
  • 200g caster sugar
  • 1 egg
  • 325g plain flour
  • 25g cocoa

For the buttercream:

  • 100g butter, softened
  • 200g icing sugar
  • 50g caster sugar
  • 2 dessert spoons cocoa
  • splash milk

For the chocolate coating:

  • 350g bar of your favourite chocolate

Method

Depending on size this recipe can make 26 - 30 Penguins.

  1. In the mixer beat the butter with the caster sugar. Not for too long, just until combined.
  2. Add the egg and mix, again not for long (less beating means less spreading in the oven).
  3. Add the flour and the cocoa and mix until it comes together into a ball.
  4. Place the biscuit dough into a large food bag and pop into the fridge for an hour.
  5. In the meantime prepare your buttercream: put all the ingredients into the mixer and combine (you may wish to pop a tea towel over the top as the icing sugar will go everywhere!). The buttercream should be stiff but spreadable.
  6. Pre-heat the oven to 160 degrees fan.
  7. Remove dough from the fridge.
  8. Sprinkle some flour onto your work surface and rolling pin and roll out half the biscuit dough – it's easier to do half at a time. Get it as thin as you can.
  9. Then cut out the shapes with your cutter and move, with a fish slice or similar, to your baking tray.
  10. Place in the oven for ten minutes.
  11. Roll out the rest of the dough and repeat.
  12. Once baked, remove from the oven, allow to cool for a few minutes, then place onto a baking rack.
  13. When completely cooled, spread one biscuit with a little buttercream. Not too much – make sure it goes to the edges.
  14. Place another biscuit on top and put to one side. Repeat with all the biscuits. You now have naked Penguins.
  15. Melt the chocolate in the microwave.
  16. Spoon or spread the chocolate over the Penguins and allow to set.
  17. EAT.
delicious penguin biscuits. Chocolate smothered biscuits.

Rock Cakes from Harry Potter and the Philosopher's Stone

rock-cake-recipe-5-1024x813.jpg

Dear Hagrid

Oh Hagrid. I think you're a wonderful man/half-giant. You scooped Harry up, as tenderly as if he were your own, and took him to safety on the motorbike. Where he'd be safe though, admittedly, ill-treated with his aunt and uncle. I bet you thought about him many times over the following decade. Then, when he was old enough, and Dumbledore's letters weren't getting through, you went to fetch him.  You took him a chocolate cake with green icing saying Happy Birthday Harry. No-one else had remembered his birthday.

When Harry started school at Hogwarts you were always keeping a look out for him. You invited him to tea, by owl letter. I bet Harry was delighted to receive his first ever owl as he knew no-one else in this new world who would send him one. His aunt and uncle wouldn’t be sending him an owl now, would they? And in that first week you made him, plus his new friend Ronald Weasley, tea and rock cakes.

It was such a thoughtful thing to do. Whenever I wish to show love to my children I bake for them; maybe they’re having a tough time of it or I want to celebrate their joy.  Making Harry rock cakes spoke volumes about your affection for the little orphan boy. Unfortunately I know your rock cakes were found to be a little hard. Teeth-breakers, apparently. Like real rocks. There is nothing worse than rock hard rock cakes. (Well, there is. Dry rock cakes where you have to pick the 'dead flies' out, but that's personal preference.)

So I thought I'd send you my recipe for rock cakes. It provides a hard (but not rock-hard) outer and a soft, moreish, inside. I flavour the dough with just a hint of vanilla and stir in chocolate chunks, instead of dried fruit - although, of course, you can use dried fruit if you wish.

Happy baking, Hagrid. Next time you have Harry to tea, even though he's grown up now, I'm sure he'll love them. In fact, I guarantee it.

With best wishes

Helen Redfern


Recipe for Rock Cakes Inspired by Hagrid

Equipment

Large mixing bowl, baking tray lined with baking parchment

Ingredients

  • 325g self raising flour

  • Pinch of salt (a very small pinch, Hagrid)

  • 175g light brown soft sugar

  • Pinch of vanilla

  • 200g soft butter

  • 200g chocolate chunks (your favourite chocolate chopped into chunks)

  • 1 egg (chicken egg, not dragon)

  • Splash or two of milk

  1. Pre-heat oven to 170 fan.

  2. In a large mixing bowl add the flour, salt, sugar and vanilla. Stir.

  3. Add the butter in small pieces, then use your fingers to combine the butter with the dry ingredients. You should end up with a crumble type mixture. (But don't do this for too long else the rock cakes will be dry.)

  4. Stir in the chocolate.

  5. Make a well in the centre of the bowl and crack in an egg. Add a splash of milk. Give it a little whisk with a fork then combine it into the rest for he mixture. Hands are probably best. (If it is too dry add a little more milk.)

  6. Divide into small balls onto the baking sheet.

  7. Bake for 15 minutes. until lightly golden.

  8. Remove from the oven, allow to cool slightly, then place onto a wire rack.

Pin it for later...

chocolate chip rock cake recipe - easy and extremely delicious. Great for bake sales, coffee mornings, tea time treats and dessert. http://abookishbaker.co.uk/

chocolate chip rock cake recipe - easy and extremely delicious. Great for bake sales, coffee mornings, tea time treats and dessert. http://abookishbaker.co.uk/

Easy Chocolate Cake Recipe

chocolate cake easy recipe

Last Friday I was um-ing and ah-ing. I was going to a friend's house for dinner and I'd suggested I take pudding. But what to make? I wanted something simple, but looked great. My mind was a blank. But then, on the dog walk during the morning (ideas always come on a dog walk) I decided on chocolate cake. It was fairly quick and simple but I knew it would go down a storm. (Which it did. It completely disappeared.)

Homemade chocolate cake is one of the nicest cakes you can make. Shop bought always has a bit of a chemically aftertaste, I don't know what it is (additives?) but in this cake all you have is butter, sugar, eggs, flour, cocoa powder and, my secret ingredient, melted dark chocolate.

RECIPE FOR EASY CHOCOLATE CAKE

Equipment

  • Two 8-inch/20cm, loose-bottomed if possible, cake tins. Grease each tin with butter on the bottom and sides then add a little flour, tapping it around so it covers all the butter. This stops the cake from sticking.
  • Electric mixer
  • Wire rack

Ingredients

For the cake

  • 225g/8oz butter
  • 225g/8oz caster sugar
  • 4 eggs
  • 200g/7oz self-raising flour
  • 25g/1oz cocoa powder
  • 100g dark chocolate (70%), melted

For the buttercream

  • 175g/6oz butter, softened
  • 340g/12 oz icing sugar
  • 1 tablespoon cocoa powder
  • 100g dark chocolate (70%), melted
  • A splash of milk
  • Maltesers or chocolate decoration of your choice
  1. Pre-heat your oven to 160 fan.
  2. Using an electric mixer combine the butter and sugar until light and fluffy.
  3. Add the four eggs along with a spoonful of the flour/cocoa powder (to stop the mixture from splitting). Mix.
  4. Add the rest of the flour/cocoa powder and mix well.
  5. Melt the dark chocolate then pour into the cake batter while the mixer is still going round.
  6. Once thoroughly combined, divide equally between the two greased cake tins.
  7. Place in the oven for 20-25 minutes.
  8. Test if cooked through by pressing the sponge lightly. If it springs back it is cooked. You can also test using a metal skewer. If it comes out clean it is cooked. If it isn't done bake for a few more minutes.
  9. Allow to cool in the tin a little then tip out onto a wire rack.
  10. To make the buttercream - in the electric mixer combine the soft butter with the icing sugar.
  11. Add the cocoa powder and melted chocolate along with a splash of milk.
  12. Mix well for a few minutes.
  13. Once the sponge has cooled spread the buttercream over one half. Then place the other half on the top.
  14. Spread the rest of the buttercream over the top and the sides.
  15. Decorate with maltesers if desired.
easy chocolate cake recipe

How to Make a Battenberg Cake

How to Make a Battenberg Cake

I've always been put off making a Battenberg despite it being my husband's favourite cake. I made one years ago and, for some reason, remembered it as being tricky. So we stuck to the bought version. But then I tried again, and, you know what, it really wasn't.

HOW TO MAKE A BATTENBERG CAKE

EQUIPMENT

A Battenberg baking tin such as this one, the Alan Silverwood Battenberg Cake Pan 8in x 6in plus an electric mixer and a rolling pin.

INGREDIENTS

  • 175g/6oz butter
  • 175g/6oz caster sugar
  • 3 eggs
  • 175g/6oz self-raising flour
  • red food colouring (I use paste)
  • 2-3 tablespoons strawberry or seedless raspberry jam
  • 500g packet marzipan, plus icing sugar to stop it sticking when you roll out
How to make a battenberg cake

METHOD

  • Pre-heat the oven to 180 regular or 160 fan.
  • Make sure the baking tin is well greased and floured, including the loose middle sections, to stop the cake from sticking (picture 1). N.B This means to grease the tin with butter then scatter a tablespoon of flour over the grease. Tip and pat the tin so the flour sticks all the way around, including the sides and especially the corners. It helps to do this over the sink.
  • In a bowl cream the butter with the sugar; then add the eggs and a spoonful of the flour and mix again. Scrape the sides of the bowl, add the rest of the flour and mix again. You may need to scrape the sides of the bowl again and re-mix.
  • Take out approximately half the mixture and fill in two sections of the tin (picture 2).
  • With the mixture that is left add a little colouring and mix. Scrape the sides and re-mix to ensure there is no yellow left. Add the pink mixture to the other two sections of the tin (picture 3).
  • Place in the oven and bake for approximately 25 minutes. When you press your finger gently against the sponge it should bounce back. Allow to cool in the tin (picture 4). Then tip out gently and allow to thoroughly cool.
  • You need to level off each section now to ensure they are all roughly the same size.  Stack so they are 2 x 2 and check your levels. Cut off un-needed sponge and re-stack. Then, carefully take off each piece so you can spread a thin layer of jam over the sides touching in the middle to stick them together (picture 5).
  • Put the cake onto one side and roll out the marzipan. Use icing sugar on the work surface and rolling pin to stop it sticking. You will have more than you need so place the cake into the centre of the marzipan and bring it up each side so you can cut it to size. It needs to wrap around the whole of the sponge. Again, put the cake to one side and spread the marzipan with jam. (It helps to spread the marzipan with the jam rather than the cake. Believe me, this is the less sticky option!) (See picture 6).
  • Bring the marzipan up and wrap around the cake. Turn the right way up so the join is now on the bottom (picture 7).
  • Cut the ends to give a neat finish (picture 8).
  • And you're finished.
how to make a battenberg cake

YOU MIGHT ALSO ENJOY:

How to Make a Battenberg Cake - a recipe

White Chocolate Chunk Shortbread

white-chocolate-chunk-shortbread.jpg

Yes today is Valentine's Day. Like Halloween, it isn't something we really do in our house. Husband and I certainly don't do presents. Cards, maybe, at a push though this year is the first year in a while I've bought him a card just because I found this one. Instead we share nice food. He might cook the evening meal. I will bake a little something. And obviously whenever I bake I always bake for love.

I adore homemade shortbread. I can eat it plain but there is something rather delicious about coming across a chunk of white chocolate that has been almost caramelised by the baking. Of course, you could also substitute the white chocolate for dark, milk, chocolate orange or even mini eggs.

Recipe for White Chocolate Chunk Shortbread

Equipment

Baking tin measuring aprox 24cm x 24cm and 3cm deep (or use a shallower but slightly larger width and length tin)

Ingredients

  • 325g plain flour
  • 225g butter
  • 100g caster sugar, with extra for sprinkling
  • 200g block white chocolate, chopped into small chunks
  • pinch of vanilla

Method

  1. Pre-heat oven to 140 fan.
  2. Grease your tin or line with baking parchment.
  3. In a bowl measure out the flour and add the butter in small chunks. Rub together to make breadcrumbs with your fingers.
  4. Stir in the caster sugar, white chocolate chunks and vanilla.
  5. Pour the crumble mixture into the tin and press down hard with your hands.
  6. Place in the oven for 30-40 minutes.
  7. Remove from oven, scatter with a little more golden caster sugar and allow to cool slightly before cutting into squares.

YOU MAY ALSO ENJOY:

white chocolate chunk shortbread recipe